Tabata Exercises for Beginners: The 4-Minute Protocol for Athletes
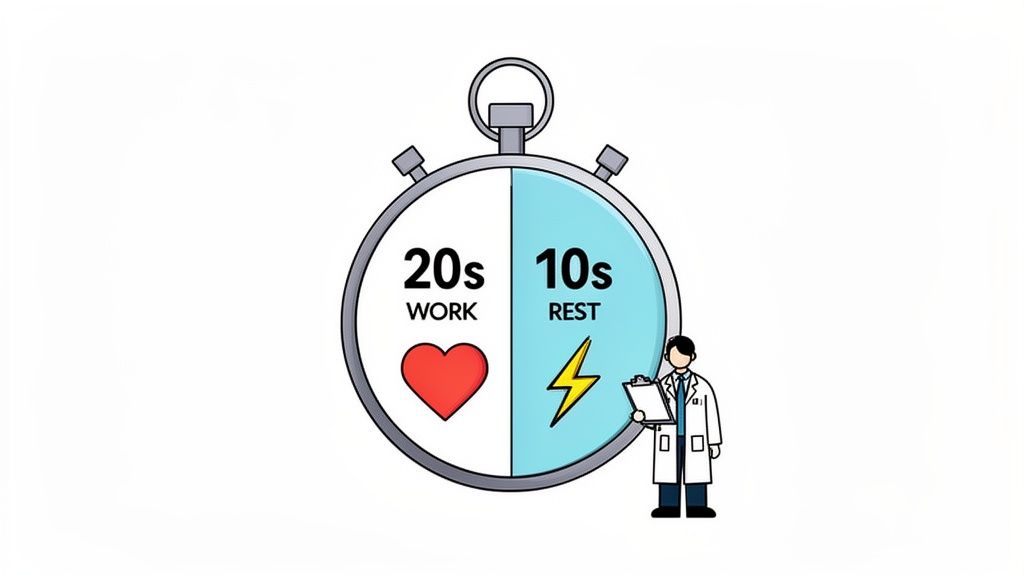
Tabata is a protocol, not a workout. The structure is non-negotiable: 20 seconds of maximum effort followed by 10 seconds of rest, repeated eight times. One round is four minutes. It’s designed to be the most demanding four minutes of your training session.
What Tabata Training Actually Is
Forget "Tabata-style" workouts. True Tabata is a specific, scientifically validated training protocol with strict parameters. It’s a tool for enhancing performance, not a casual fitness trend.
The protocol is named after Dr. Izumi Tabata, who analyzed the training methods of the Japanese Olympic speed skating team in the mid-90s. His 1996 study tested the protocol's effectiveness.
The method was precise: 20 seconds of cycling at 170% of VO2 max, then 10 seconds of rest, repeated eight times. The results were significant. In six weeks, the Tabata group increased anaerobic capacity by 28% and VO2 max by 14%, substantially outperforming a control group doing an hour of steady-state cardio five times a week.
The Core Principles of Real Tabata
Executing Tabata correctly requires adherence to its core principles. It's not just about the 20/10 split; it's about maximal intensity within that structure.
- Maximum Intensity: The 20-second work interval is an all-out effort. If you can speak or feel you have more to give after 20 seconds, the intensity is too low.
- Rigid Timing: The 20/10 structure is fixed. The 10-second rest is intentionally insufficient for full recovery. This incomplete recovery is crucial for forcing physiological adaptation.
The objective isn't to feel good after four minutes. The objective is total depletion. By round seven or eight, maintaining form and output should be a significant challenge.
This protocol differs fundamentally from traditional cardiovascular training.
Tabata Protocol vs. Traditional Cardio
The table below outlines the core differences in methodology and physiological targets.
| Metric | Tabata Protocol | Traditional Cardio |
|---|---|---|
| Duration | 4 minutes (per cycle) | 30-60 minutes |
| Work Interval | 20 seconds (maximum intensity) | Continuous (moderate intensity) |
| Rest Interval | 10 seconds (incomplete recovery) | N/A |
| Intensity | 170% VO2 Max (Anaerobic) | 60-70% VO2 Max (Aerobic) |
| Primary Goal | Increase anaerobic and aerobic capacity | Improve cardiovascular endurance |
These are two distinct training modalities. One is a maximal-effort sprint protocol; the other is a sub-maximal endurance effort.
Why This Structure Is So Effective
The 20/10 split forces a high volume of intense work in a compressed timeframe. During the 20-second intervals, the body operates anaerobically, unable to supply sufficient oxygen to meet muscular demand.
The short rest period prevents the aerobic system from fully recovering. Each successive round drives a deeper oxygen debt, compelling the body to improve its energy production efficiency under stress. This simultaneous stimulus is what improves both anaerobic power and aerobic endurance, making it a powerful tool for breaking through performance plateaus.
Preparing for a Tabata Session
Success in a Tabata session is determined before the timer starts. The four minutes are intense; preparation ensures that intensity is productive. This isn't a casual workout; it's a protocol requiring precision.
Setup your space, equipment, and body to handle an all-out, four-minute effort against the clock. Clear an adequate area for movement. Ensure your footing is secure, especially as fatigue and sweat become factors.
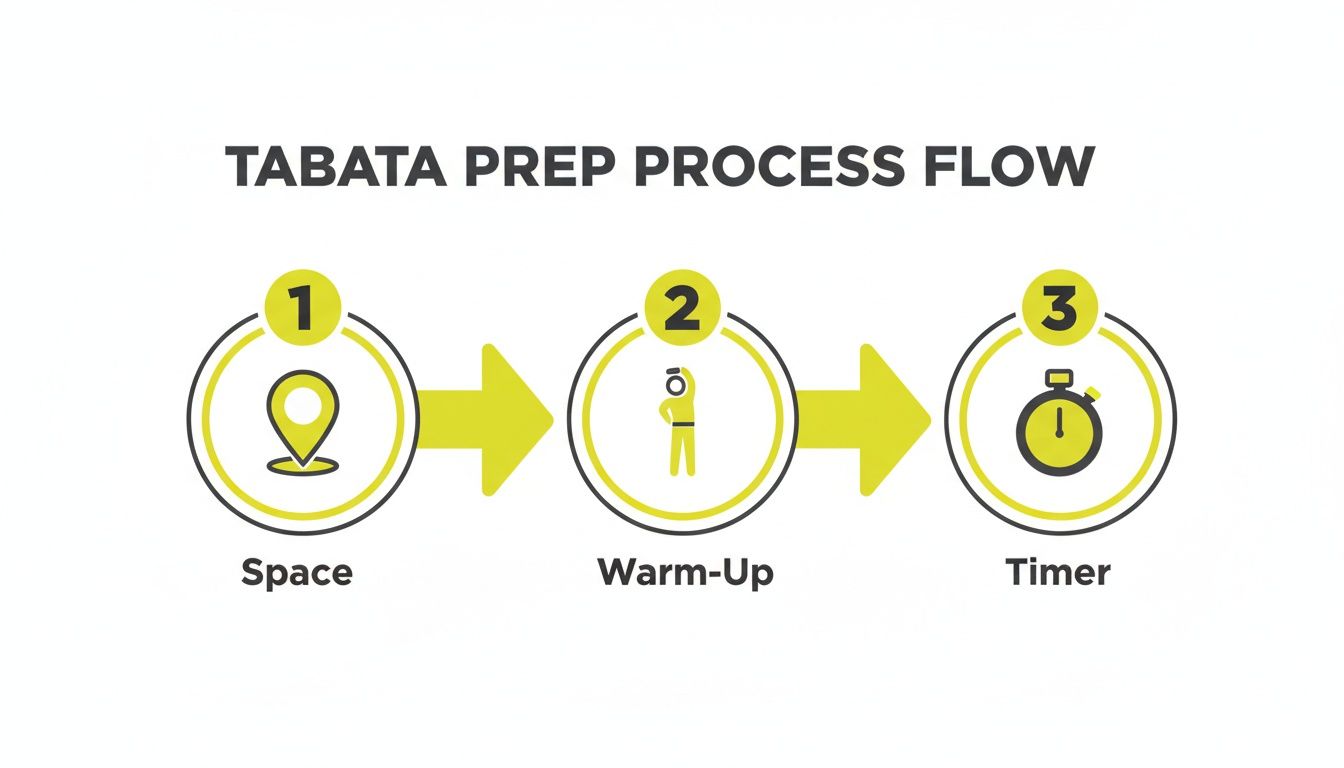
Essential Equipment: The Interval Timer
Your most critical tool is an interval timer. Attempting to watch a clock is an unacceptable distraction. You need a dedicated tool to automate the timing so you can apply 100% of your focus to form and effort.
Program your timer with three settings:
- Work: 20 seconds
- Rest: 10 seconds
- Rounds: 8
This is the entire structure. A reliable timer app will allow you to save this as a preset for efficiency. If you need one, a dedicated HIIT timer app is designed for this specific application.
Audio cues from a timer are not background noise; they are your primary guide. At maximum heart rate, you won't be reading a screen. Clear, loud alerts for work and rest intervals are essential for maintaining protocol without breaking mental focus.
The Dynamic Warm-Up
Attempting a Tabata workout cold risks injury and guarantees poor performance. Maximal-effort, explosive movements require prepared muscle tissue. A dynamic warm-up is not optional.
The goal is to increase blood flow, activate target muscle groups, and mobilize joints. This should take 5–10 minutes and gradually elevate your heart rate. Avoid static stretching until after the session.
A functional warm-up sequence:
- General Movement (2-3 minutes): Light cardio like jogging in place, jumping jacks, or jump rope to increase body temperature.
- Dynamic Stretches (3-5 minutes): Movements that mimic the upcoming exercises: leg swings, arm circles, torso twists, and walking lunges.
- Specific Activation (2 minutes): Perform a few reps of your selected exercise at 50% intensity. For air squats, do 10-15 controlled reps. This primes the specific neuromuscular pathways for the first interval.
The Cool-Down
The workout ends with a structured cool-down, not when the final timer sounds. This initiates the recovery process. Abruptly stopping is a systemic shock; a gradual transition is superior.
Allocate 5–10 minutes post-workout. Begin with low-intensity movement like walking or light cycling to help your heart rate descend gradually and aid in clearing metabolic byproducts.
Follow this with static stretching. Hold each stretch for 20–30 seconds, focusing on the primary muscles used. This signals the transition from work to recovery and is a key habit for sustainable training.
The 15 Essential Tabata Exercises
Effort is the primary driver, but quality of movement determines the outcome. The goal is to execute clean, powerful reps under fatigue. These 15 foundational exercises are organized by movement pattern.
Each is simple enough to learn quickly but effective enough to challenge you at maximum intensity. Pay attention to form cues, common errors, and scaling options. This is your toolkit for constructing effective four-minute training blocks.
Lower-Body Power
These movements target the largest muscle groups—quads, glutes, hamstrings—to drive heart rate and build functional strength.
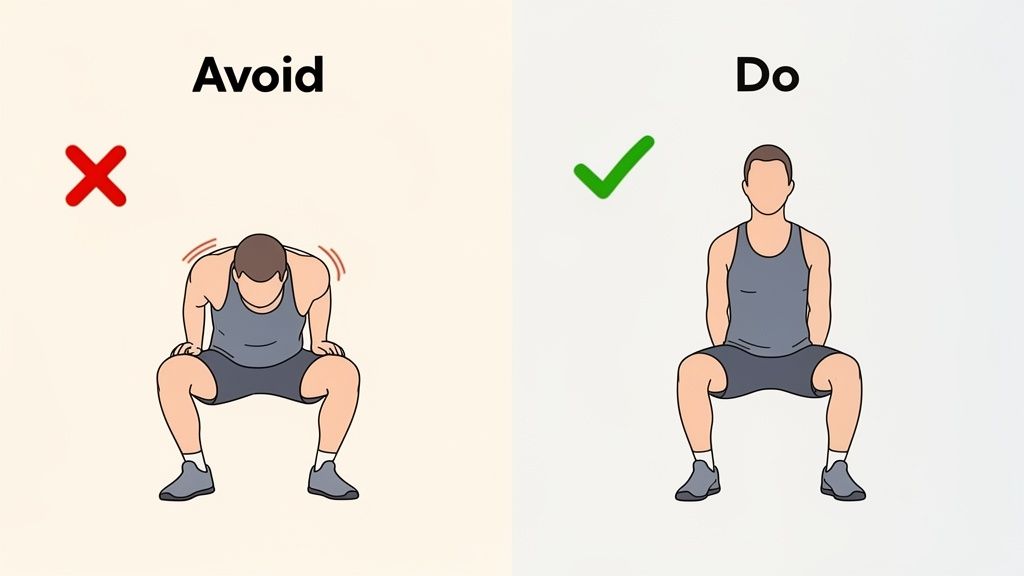
1. Air Squat The foundation. Feet shoulder-width apart, chest up, core braced. Initiate by sending hips back and down. Maintain weight in the heels and reach at least parallel before driving back to a standing position.
- Common Fault: Knees caving inward (valgus collapse). Cue: push knees out over the small toes.
- Scale Down: Reduce depth. Squat only as low as perfect form allows.
2. Alternating Lunges Develops single-leg stability and power. Step forward, lowering hips until both knees form 90-degree angles. Front knee tracks over the ankle; back knee hovers above the ground. Drive through the front heel to return to start, then switch legs.
- Common Fault: Pushing off the toes. Power must originate from the front heel.
- Scale Down: Perform reverse lunges. Stepping backward reduces anterior knee stress.
3. Jump Squats Adds plyometric demand. Perform an air squat, then explode vertically from the bottom position. Land softly, absorbing the impact by immediately descending into the next squat.
- Common Fault: Landing with straight legs. This transfers impact to the joints. Always land with bent knees.
- Scale Down: Perform a powerful calf raise at the top of each air squat.
4. Glute Bridges Isolates the posterior chain. Lie supine, knees bent, feet flat and close to the glutes. Drive through the heels to lift hips until a straight line forms from shoulders to knees. Squeeze glutes at the top before lowering.
- Common Fault: Lumbar hyperextension. Maintain a braced core to prevent this.
- Scale Down: This is a base-level movement. Focus on quality of contraction.
Upper-Body and Core
These exercises build upper-body pressing strength and core stability. Maintaining a rigid torso is as critical as the movement itself.
5. Push-Ups (Scaled) Start in a plank. Hands slightly wider than shoulders. Body forms a straight line. Lower the chest toward the floor, then press up powerfully.
- Common Fault: Elbows flaring out wide. Keep them tucked at a 45-degree angle to the body.
- Scale Down: Elevate hands on a box or bench, or perform from the knees.
6. Plank Jacks From a high plank, jump feet out wide and back together, like a horizontal jumping jack. The objective is to keep the hips and torso completely stable.
- Common Fault: Hips sagging or bouncing. Brace the core as if anticipating impact.
- Scale Down: Step one foot out at a time to reduce impact.
Full-Body Metabolic Drivers
These exercises recruit muscle groups from the entire body, elevating heart rate rapidly. They are staples of high-intensity conditioning.
7. Burpees (Scaled) The standard for conditioning. From standing, drop hands to the floor, kick feet back to a plank, perform a push-up, jump feet back in, and explode into a vertical jump.
- Common Fault: Segmenting the movement. Aim for one smooth, efficient motion.
- Scale Down: Step feet back instead of jumping and omit the push-up.
8. Mountain Climbers From a high plank, drive one knee to the chest, then rapidly switch legs. Maintain a stable core and low hips.
- Common Fault: Hips rising. Keep the back flat and engaged.
- Scale Down: Reduce the pace. Focus on a controlled knee drive.
9. High Knees A simple but effective cardio drill. Run in place, driving knees as high and fast as possible. Use arm drive to generate power.
- Common Fault: Leaning back. Maintain an upright, neutral torso.
- Scale Down: Perform a high-knee march to eliminate the impact.
Core Stability and Strength
All athletic movement originates from the core. A stable midsection is non-negotiable for performance and injury prevention.
10. Plank Hold A test of pure core stabilization. Hold a plank on hands or forearms, maintaining a perfectly straight line. Actively squeeze glutes and brace abdominals.
- Common Fault: Hips sagging or piking. A neutral spine is the goal.
- Scale Down: Hold the plank from your knees.
11. Russian Twists (Bodyweight) Sit on the floor, knees bent, feet elevated. Lean back to engage the core. Twist the torso from side to side, touching the floor beside each hip.
- Common Fault: Using arm momentum. The rotation must originate from the obliques.
- Scale Down: Keep heels on the floor for a more stable base.
12. Flutter Kicks Lie supine, legs straight, hands under the lower back for support. Lift heels slightly and perform small, rapid, alternating kicks.
- Common Fault: Lower back arching. Keep it pressed firmly into the hands.
- Scale Down: Bend knees slightly or increase the height/amplitude of the kicks.
Power Exercises (Equipment Required)
A single piece of equipment can introduce new power development challenges. These are accessible options for learning to generate force.
13. Kettlebell Swings (Russian Style) Feet wider than shoulders, holding a kettlebell. Hinge at the hips, swinging the bell back between the legs. Explosively drive the hips forward to propel the bell to chest height. This is a hip hinge, not a squat.
- Common Fault: Lifting with the arms. The arms are merely hooks; power comes from the hips.
- Scale Down: Use a lighter kettlebell or practice the hip hinge pattern with no weight.
14. Dumbbell Thrusters Hold two light dumbbells at the shoulders. Perform a full front squat. As you ascend, use leg drive to press the dumbbells overhead to full lockout.
- Common Fault: Disconnected movement. The squat and press must be one seamless, powerful motion.
- Scale Down: Use very light dumbbells or practice the movement pattern unloaded.
15. Box Jumps (Low Box) Use a low, stable box. Stand before it, dip into a quarter squat, and use arm swing to explode vertically, landing softly on the box in a partial squat.
- Common Fault: Loud, jarring landing. Aim for a quiet, controlled landing.
- Scale Down: Use a lower box or perform step-ups.
The Tabata protocol's efficacy is well-documented. The original 1996 study reported a 14% increase in VO2 max and a 28% increase in anaerobic capacity. The subjects were elite athletes training at an intensity of 170% of their VO2 max. Subsequent research has shown that 6-12 weeks of Tabata training can improve VO2 max by 9.2-15.0%, confirming its utility as an efficient conditioning tool. To understand the science more deeply, you can learn more about the history of Tabata training and find out why it’s so effective.
Programming Your First 4-Minute Tabata Workouts
Theory is done. Time to execute. Structuring a Tabata workout is about selecting movements that allow you to maintain high intensity safely while targeting a specific physical adaptation.
We will progress from single-exercise protocols to two-movement couplets, and finally to four-exercise circuits. This progression develops movement mastery under fatigue before adding complexity, building a solid foundation.
The Single-Exercise Protocol
This is the purest form of Tabata and the ideal starting point. Dedicating all eight rounds to one movement creates a significant mental and physical challenge, forcing you to focus on a single pattern while pushing your limits.
This format provides a clear benchmark of your conditioning. The goal is to maintain consistent form and rep count from round one through eight, even as muscular fatigue becomes overwhelming.
Workout 1: Air Squat Protocol
This is a direct test of lower body endurance and metabolic capacity.
- Exercise: Air Squats
- Structure: 8 rounds of 20 seconds of max-rep Air Squats, followed by 10 seconds of rest.
- Logic: The air squat recruits the body's largest muscle groups, driving a high metabolic and cardiovascular response. Isolating this movement creates intense localized muscular endurance stress while simultaneously taxing the cardiovascular system.
Scaling Progression:
- Level 1 (Beginner): Focus exclusively on perfect form. Squat to a controlled depth. Do not prioritize speed; simply maintain continuous movement for 20 seconds.
- Level 2 (Intermediate): Push for consistent output. Aim for the same number of quality reps in each round. A target of 10-15 reps per interval is a solid benchmark.
- Level 3 (Advanced): Add plyometrics. Execute the protocol with Jump Squats to increase power demand.
The Couplet
After mastering single-exercise protocols, progress to a couplet—alternating between two movements. This allows one muscle group or system a brief period of active recovery while another works, enabling a higher overall intensity throughout the four minutes.
Couplets are effective for full-body work or for pairing complementary movements, such as an upper-body press with a lower-body metabolic driver.
Workout 2: Push/Cardio Couplet
This combination targets upper-body strength and maintains high cardiovascular output.
- Exercise A: Push-Ups (scaled appropriately)
- Exercise B: High Knees
- Structure: Alternate exercises each round (Round 1: Push-Ups, Round 2: High Knees, Round 3: Push-Ups, etc.).
- Logic: Push-Ups fatigue the chest, shoulders, and core. The switch to High Knees allows the upper body to recover slightly while keeping heart rate elevated, preventing localized muscular failure from terminating the workout prematurely.
For more programming ideas, especially for limited space, reference this guide to the best home HIIT workouts.
Execution Note: In a couplet, transitions are critical. The 10-second rest is your window to get into position for the next movement. Be ready to execute the moment the timer signals the start of the work interval.
The Full-Body Circuit
The next progression is a four-exercise circuit. This structure provides the most variety, hitting multiple muscle groups and movement patterns within a single four-minute block. It's an efficient method for developing general physical preparedness (GPP).
Select four exercises that you can perform with sound mechanics even under significant respiratory distress. Simple movements allow for rapid and seamless transitions.
Workout 3: Four-Movement Bodyweight Circuit
A total-body protocol requiring zero equipment.
- Exercise 1: Burpees (scaled)
- Exercise 2: Plank Hold
- Exercise 3: Alternating Lunges
- Exercise 4: Mountain Climbers
- Structure: Perform each exercise for one round, then repeat the sequence (R1: Burpees, R2: Plank, R3: Lunges, R4: Climbers, then repeat for R5-8).
- Logic: This circuit strategically manages fatigue. It begins with a maximal metabolic demand (Burpees), shifts to core stabilization (Plank), targets the lower body (Lunges), and concludes the loop with more core and cardio work (Climbers). By constantly varying the stimulus, you can sustain a higher work rate for the full four minutes.
Beginner Tabata Workout Templates
Use these templates as a starting point. Select one based on your training goal for the day.
| Workout Name | Exercises | Structure |
|---|---|---|
| Lower Body Burnout | Air Squats | All 8 rounds are Air Squats. |
| Push/Cardio Blast | Push-Ups & High Knees | Alternate between Push-Ups and High Knees for 8 rounds. |
| Total Body Blitz | Burpees, Plank, Lunges, Climbers | Perform each exercise for one round, then repeat the sequence. |
The effectiveness of this protocol is why it has endured. A 2020 study demonstrated that Tabata sprints performed twice a week for eight weeks increased VO2 max by 11%. After CrossFit brought HIIT to the forefront in the 2000s, Tabata's popularity surged. By 2013, Forbes was covering its widespread adoption as trainers sought certification in the method.
Safety and Progression
Tabata is defined by intensity, which necessitates intelligent application. The goal is not merely to survive four minutes but to push your operational limits without injury to facilitate adaptation.
Address these common errors from the start to build a sustainable training practice.
Prioritize Quality Over Reps
This is the most frequent and critical error. In later rounds, as fatigue accumulates, the temptation is to sacrifice form to maintain movement. A partial-depth squat with a rounded lumbar spine or a burpee with poor core control is a failed rep.
This behavior reinforces poor motor patterns and increases injury risk. Master the movement before you attempt to maximize its speed or volume. If form degrades, slow down, reset, and complete the interval with quality repetitions.
Keep the Exercises Simple
A Tabata protocol is not the environment for practicing novel, complex skills like a pistol squat. The combination of short work intervals and accumulating fatigue demands movements that are ingrained and can be performed safely under duress.
Stick to foundational exercises: air squats, push-ups, mountain climbers. Progression to more complex movements should only occur after a base of conditioning has been established.
The measure of a successful Tabata is not the complexity of the movements, but the intensity at which you can execute fundamental patterns without form degradation.
Ensure Sufficient Intensity
Conversely, some athletes are overly conservative. True Tabata requires a genuine 100% effort during the 20-second work intervals. If you finish a four-minute block feeling capable of immediately starting another, your intensity was insufficient.
Each interval is a sprint. By the end of the protocol, you should be at your respiratory limit. If you are not reaching this state, select a more demanding exercise or increase your repetition count. For athletes with joint limitations, exploring low-impact, high-intensity training can provide options for safely reaching maximal cardiovascular effort.
A Framework for Intelligent Progression
Progress should be systematic. Once you can complete a four-minute Tabata with excellent form and consistent high intensity, you are ready to advance.
Follow this progression model:
- First, increase rep count. Before altering any other variable, add one or two more quality reps to each interval.
- Next, increase movement complexity. Once you are maximizing reps on a base exercise (e.g., air squat), progress to a more demanding variation (e.g., jump squat).
- Finally, stack protocols. For a longer session, perform multiple Tabata blocks. Complete a full four-minute Tabata, take 2-3 minutes of complete rest, then begin a new protocol with different exercises. This maintains the required intensity for each block.
This structured approach ensures you are constantly challenged while operating from a solid foundation of movement quality.
Frequently Asked Questions
Common questions for athletes new to the protocol.
How often should a beginner do Tabata?
For beginners, 2-3 Tabata sessions per week on non-consecutive days is an appropriate frequency. This allows sufficient time for recovery and adaptation.
A true Tabata session places significant stress on the central nervous system. Listen to your body. If you experience excessive fatigue or soreness, take an additional rest day. Long-term consistency is more valuable than short-term volume.
Can I do a 20-minute Tabata workout?
Yes, but it is not a single, continuous 20-minute session. A true Tabata protocol is always four minutes.
A longer workout is constructed by "stacking" these four-minute blocks with prescribed rest periods in between. A 20-minute session is a series of distinct protocols. Example structure:
- Block 1: 4-Minute Tabata of Kettlebell Swings
- Rest: 2-3 minutes
- Block 2: 4-Minute Tabata of Burpees
- Rest: 2-3 minutes
- Block 3: 4-Minute Tabata of Air Squats
The rest period is mandatory. It enables you to apply the required maximal intensity to the subsequent block. Pacing yourself to get through 20 minutes negates the entire purpose of the protocol.
The efficacy of Tabata lies in the maximal intensity of each 4-minute block. If you are holding back in round one because you are thinking about the next 16 minutes, you are no longer doing Tabata; you are doing standard interval training. Execute each block as a singular event.
What is the difference between Tabata and HIIT?
The distinction is critical. Think of HIIT (High-Intensity Interval Training) as a broad category of training. Tabata is a specific, defined protocol within that category.
HIIT encompasses any combination of work-to-rest intervals (e.g., 30s on/30s off, 60s on/120s off). The variables are flexible.
Tabata is defined by its rigid structure: exactly 20 seconds of maximum-effort work, followed by 10 seconds of rest, repeated for eight rounds (4 minutes total). While all Tabata is HIIT, not all HIIT is Tabata. The specific timing and absolute intensity requirement are what set it apart.
A stopwatch is an inadequate tool for a precision protocol. The KNTC interval timer is designed for athletes who require accuracy and focus. With saved presets, audible cues, and a clear display, you can initiate a workout in seconds. It's time to train with intent.
Unlocking Peak Conditioning with Tabata HIIT Workouts
Discover how real Tabata HIIT workouts build elite conditioning. Learn the science, sample routines, and programming tips to maximize your performance fast.
A Practical Guide to Home CrossFit Workouts for Beginners
Start your journey with effective home CrossFit workouts for beginners. This guide provides foundational movements, sample WODs, and smart training principles.